How to Make Your Own Hot and Cold Pack for Pain Relief
Years ago when I first started doing massage therapy, I recall that microwavable rice packs were all the rage. I've seen some that also contain buckwheat hulls and other products, but you can make your own rice pack for a fraction of the price that's being charged for fancy ones in the stores (sometimes upwards of $15).
But why wouldn't you just get a heating pad? You can get one of those too, but these packs conform much better to areas of the body that a stiff heating pad just can't such as the knees and the head. They're great for ear and head pain when warmth is what you need.
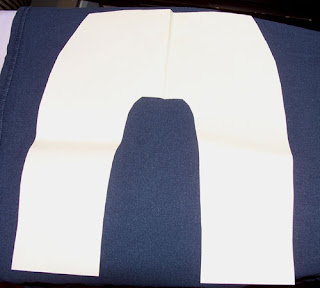
With this post, I'm going to assume that you have basic sewing skills. There are two types of packs that I like to make, a U-shaped pack and a rectangular pack. The U shape is good for neck pain. I create a pattern using paper. At right is a pattern from packing paper but you can use newspaper or anything else you have lying about.
Tip update 7/4/11: I forget to add that the U-pattern is easier to create if you do it like you would a paper snowflake. Fold the paper in half lengthwise and create the pattern on the fold but then cut the middle out. That way you have a uniform shape. If I get a chance, I'll post more pics.
I recently made a U-shaped pack for a relative and forgot to take a pic of the finished product but you'll get the idea from the instructions. Once you create the pattern the size you want (I wouldn't go larger than about 8 inches long, reason given below), here are the supplies you'll need:
Making the Rice Pack
Cut 2 pieces of fabric from the pattern you made. Sew them right sides together but leave an opening large enough to pour the rice in. Turn the piece right side out. After putting the rice (and optional spices) in, fold ends under and sew the opening closed. You don't want to completely stuff the pack with rice. Leave some slack so that you can easily form it to the area you're covering. It also heats better with more air in the pack. Sometimes I make a slightly larger covering from the same pattern that can be taken off and thrown in the wash.
How to Use the Rice Pack
If you didn't make it much larger than I did, then you can throw it in the microwave for about 2 minutes (I have an 1100 watt oven). This is the reason you don't want to make it too large. You'll have to heat it for longer which could be dangerous with such a dry item and it just won't retain its heat for very long. If you ever get the rice pack wet, then it's game over. The rice will go bad.
You can also place the pack in the freezer for a few hours to use it as a cold pack. In fact, it's great to have two of these on hand so you can alternate. Freezing it also perks up the spices a bit if they seem to be losing their scent.
© P.J. Deneen
But why wouldn't you just get a heating pad? You can get one of those too, but these packs conform much better to areas of the body that a stiff heating pad just can't such as the knees and the head. They're great for ear and head pain when warmth is what you need.

With this post, I'm going to assume that you have basic sewing skills. There are two types of packs that I like to make, a U-shaped pack and a rectangular pack. The U shape is good for neck pain. I create a pattern using paper. At right is a pattern from packing paper but you can use newspaper or anything else you have lying about.
Tip update 7/4/11: I forget to add that the U-pattern is easier to create if you do it like you would a paper snowflake. Fold the paper in half lengthwise and create the pattern on the fold but then cut the middle out. That way you have a uniform shape. If I get a chance, I'll post more pics.
I recently made a U-shaped pack for a relative and forgot to take a pic of the finished product but you'll get the idea from the instructions. Once you create the pattern the size you want (I wouldn't go larger than about 8 inches long, reason given below), here are the supplies you'll need:
- Fabric scraps. Quilting calico is nice. Muslin and old clothing like T-shirts work well. You don't want a heavy fabric as it won't heat well in the microwave.
- Rice. I used about 5-6 cups for the most recent one I made.
- Optional spices such as whole cloves and coriander to make it smell nice when it's heated up. Break up the spices a bit to release the scent.
Making the Rice Pack
Cut 2 pieces of fabric from the pattern you made. Sew them right sides together but leave an opening large enough to pour the rice in. Turn the piece right side out. After putting the rice (and optional spices) in, fold ends under and sew the opening closed. You don't want to completely stuff the pack with rice. Leave some slack so that you can easily form it to the area you're covering. It also heats better with more air in the pack. Sometimes I make a slightly larger covering from the same pattern that can be taken off and thrown in the wash.
How to Use the Rice Pack
If you didn't make it much larger than I did, then you can throw it in the microwave for about 2 minutes (I have an 1100 watt oven). This is the reason you don't want to make it too large. You'll have to heat it for longer which could be dangerous with such a dry item and it just won't retain its heat for very long. If you ever get the rice pack wet, then it's game over. The rice will go bad.
You can also place the pack in the freezer for a few hours to use it as a cold pack. In fact, it's great to have two of these on hand so you can alternate. Freezing it also perks up the spices a bit if they seem to be losing their scent.
© P.J. Deneen

Firstly..I hate Blogger. I can never comment with my Google ID. lol
ReplyDeleteI recently bought a rectangular heat pack but want to try making one like this for my neck.